Newbie: How to set take-off altitude?

Hi all,

Sorry if this was answered before, but after searching the forum for 1/2h I can’t find it:

How do we set the take-off altitude for each flight?

The case in question is this:

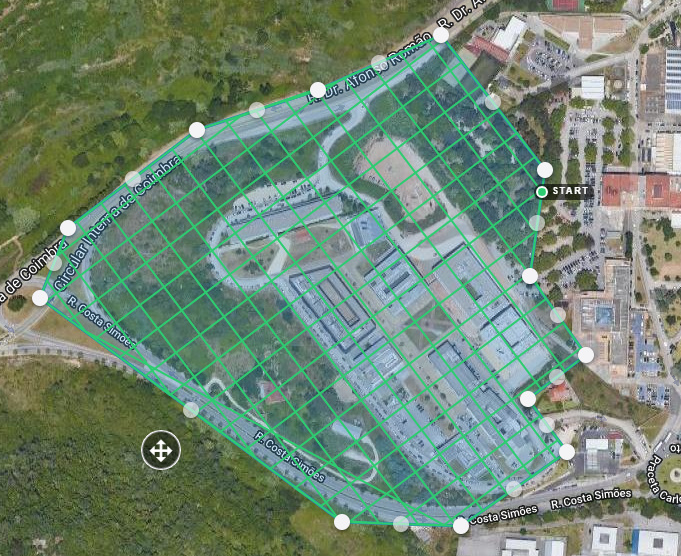
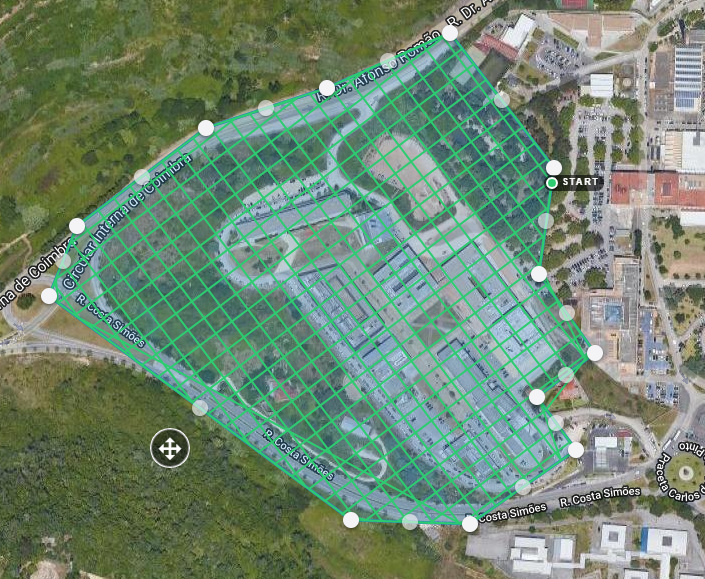
I have a reasonably large area to map in 3D (14 hectares), with large buildings which are about 20 meters high, and the ground slope also adds some 15 meters in some points (actually it takes, since it’s lower ground).

The rules of drone flight here in Portugal mandate that we always have visual sight on the drone (VLOS), which is not a problem since I plan to take-off from the top of the tallest building (~25m).

When planning the flight and based on some experiments I want to put around 50 m vertical distance from the rooftops to the drone, meaning 75m flight are set, and overlaps optimized by “Overlap Optimizer” already.

The problem:

If I take-off at 75m altitude from the rooftop, the drone will fly at 100m, making all the math for overlap, grid and distances nonsense.

I I take-off from the ground, I get the altitude correct, but I loose too much time and effort going to the rooftop at each battery swap, and I need to do at least 4 swaps… over an hour flying, it’s just not practical.

What is the best practice you guys follow/recommend for such cases?
Is there a hidden option somewhere where we can preset the take-off altitude?

Thanks in advance for your kind help,
-jprates

1 Like

What are you mapping with?

What is the total variance from low point to high point of the project?

I think that if it varies more than 20-30m then it would probably be best to split it into multiple flights and manually upload to a single flight. If you have a 20m delta and takeoff from the mean elevation at the 60m sweet spot then your imagery will range from 40m to 80m. That large of a separation will not only cause some accuracy problems when processed, but you will lose overlaps in some areas and resolution will suffer in others. Then you have to take into account the structures. I often have to fly separate missions just to get some more images of buildings to make sure that the tops get enough coverage.

We’re still waiting on Terrain Following…

Hi, thanks a lot for your answer MichaelL.

I’m considering using just DroneDeploy upload, if the results on the trial look satisfactory I will keep it.

Lower ground (parking lot) is at about 69m ASM, upper ground varies up to 97m ASM.
Most buildings are at around 92m ASM with about 20m to 25m high from ground level, therefore rooftops at about 115m give it or take.

My idea was to fly at 75m from average building ground level (92m ASM), but with takeoff from a rooftop 25m above at 115m ASM.

In summary, with flight level @75m:

  1. Rooftops app. 50m below flight level
  2. Building floor level app 75m below flight level
  3. Parking area with ground app 103m below flight level
  4. Building area without any landmarks apart from buildings themselves;
  5. Parking area with very high trees, estimated 30m high, so treetops app 45m below flight level

My current flight settings are at 75% front and side overlap, with crosshatch and perimeter generating 673 images.

Please allow me to go back to my initial question: I want to takeoff from 25m above my reference (buildings floor level), but keep this level of detail as is. How do I achieve this?

If I change the flight level to 50m the crosshatch goes crazy in detail with unnecessary extra flight hours.

Surely I’m not the first person to ever ask for this feature? To preset the takeoff base altitude to other than zero?

1 Like

There really is no reference or offsets in DroneDeploy. Wherever you takeoff from is 0m. A 50m AGL from the rooftop would give you your 75m to ground. Then it just depends on what the terrain does.

Not knowing the layout of the subject it is hard to speculate, but it sounds like you can fly the buildings and adjacent terrain in one and catch the lower shelf in another.

Do you have coordinates you can share?

It may be a better plan to fly two standard nadir missions for the terrain and an individual Enhanced 3D mission(s) for the buildings depending on how they are laid out.

I really think splitting the flight is not necessary but won’t mind to do so if needed.

What bothers and angries me is to think there is no such simple feature as takeoff altitude preset.

I need to takeoff from the rooftop to be able to operate VLOS, I can’t be at the ground level each time I need to swap a battery or have extra personnel just to perform the swap every 20 minutes.

I don’t want to sound rude, but this way to operate is just plain dumb.
Surely DroneDeploy has a better solution… hello support…

1 Like

I don’t I think I am quite understanding the issue you are experiencing. When mapping you want to think about your upper and lower elevation range. This will determine what AGL you are going to fly. There is one setting for the AGL and my advice was not to fly within 30m of the subject when nadir mapping and no higher than 85m above-ground for resolution quality. I think the terrain-following is something that would help clarify it for you, but the terrain is only as accurate as the last Google Earth scan. There is potential to fly a quick map and then use that surface as the terrain to follow, but there is a lot of research involved so a timeline is not available.

Here’s a map of the Google SRTM contours. It reports about 25-30m in elevation change, but it is Google “accuracy”… As I suspected when I saw the map that the building are on an upper-shelf and there is a definite line of increased grade break below them.

Now that I see the buildings are very localized I would suggest running one nadir flight at 25m above the rooftop to capture the entire site. Then do an Enhanced 3D flight in this area 25m above the roof. You definitely don’t want to do Enhanced 3D around the entire site. Personally I would split the building area in two for Enhanced 3D, but this all depends on the level of quality you need.

1 Like

Humm, I thought the problem was clear, but since that is not the case, here goes another try to explain:

My preference from previous trials on other locations is to fly about 50m from rooftops, which translates in this case to about 70 to 75 meters from the ground, having buildings about 20 to 25 meters high.

If I put these preferences in the DroneDeploy FLY app, and optimize it, I get this layout for the crosshatch, translating into a total of 79min10sec of flight and 673 photos (3D enhance ON):

This is what I want, it seems right, the crosshatch as the correct size, it’s fine.

However, please do remember that this flight plan is fine if I go to the terrain and takeoff from the ground, from street level. That’s the way it was designed to work, takeoff from ground level is reference flight level 0.

It so happens I can NOT fly from the street, because there is no place outdoor where I can have visual contact with the drone 100% of the time. In here we need to have Visual Line Of Sight flight at all times, plus this is a restricted airspace with even tighter rules, I really can NOT fly without having my eyes on the drone at all time.

So the solution is to go to a higher ground, namely to a rooftop, choosing one from all of these buildings. But now, if I takeoff from the rooftop, and execute the flight, the drone will go up 75m as if it was on the ground, and that is 25 higher than intended, I will loose resolution and the crosshatch will not serve this new flight altitude, it won’t work!

Some would say “just change the altitude from 75m to 50m on DroneDeploy”, but alas that will of course not work, because at lower altitudes the crosshatch needs to be far more dense, and just changing from 75m to 50m gives this mesh on the very same site:

That’s a crazy 111min long flight and 1423 photos, surreal, nothing close to what we want.

I hope you (and anyone else) now understand the problem: How to fly the correct flight plan without having the drone go up the 75m and just do 50m above takeoff altitude?

The drone is not using GPS elevations for any reference. Where you put the drone is 0m and the barometer and vision sensor calculate the +/- elevation in reference to where you took off. If you set your flight plan to 50m it will takeoff to 50m AGL (or Above Roof Level) and everything is a plus or minus from there. The patterns that are derived by DroneDeploy are in a 2D world. To achieve the overlaps as you have input is in relation to AGL assuming all ground is level. As the ground recedes the more overlap you will get, but the worse the resolution will get.
As a side note until DroneDeploy has terrain following I will continue to fly all projects with these characteristics with Litchi. At least the entire site mission that is… I can still fly the buildings with DroneDeploy.

1 Like

Don’t blame the drone, nor the GPS, blame DroneDeploy.

I want the 75m crosshatch lifting off from 25m, and there is no way to do it.

Thanks for the Litchi hint.

1 Like

I definitely didn’t blame the drone itself, GPS is irrelevant and DroneDeploy’s only fault is not have terrain following. I think learning the process and how to configure to achieve your goal with the tools available is the only way you are going to get around this roadblock in your thinking. I have been mapping for a long time and I still have not found a single solution that provides all functionalities desired. Litchi would be the closest if it had the lawnmower pattern.

1 Like

Regarding your SRTM analysis, you got it, that’s it.
There’s only one major detail you’re missing just because I did not tell you.
I do need the terrain (most of it at least) as this project is all about simulating the shadows casted by those buildings on the ground to find the sweet spot(s) for a large PV (solar) plant.
I was going to map only the part of the terrain I need, but I realized it was about 75% of the total, so I will just do it all and save the work for some other request down the road.
It’s very hard to get a permit to fly there, so I must take this chance and do it all in one blow.
Again, I can’t thank you enough for spending this time to share your thoughts on this project of mine.

2 Likes

Is there some kind of feature request list or form where one can include this takeoff altitude preset as a new feature request for a later DD software build?

There is. Start a new Topic, select Categories and choose Feature Request.

1 Like

Why not start GO4/Pilot/Litchi, take off from the roof and land on ground level at a safe spot with with good VLOS before you change app to DD and take off from ground level and fly your mission?

Each time you have to change battery, you have to abort mission to avoid landing at the RTH safe spot and land at the roof for battery change.

Then fly manually down to the safe spot and start DD and continue/resume flying the grid.

If you have 2 RCs, you can run DD on the primary RC and Go4 on the secondary RC, which will be a bit smoother.

Argh! Talk about a messy workaround!

The logic seems to be there, it should work indeed, but… boy what a mess of trouble…

And my mission uses 5 to 6 batteries, so lots of work for something a simple extra attribute/setting could do quite easily.

This is sooooo easy to implement in code that I doubt DD developers would take more than a day to implement and test.

2 Likes

Some times one have to eat an elephant to get a job done.

I agree with your time estimate, the code part is less than an hour.

I would even like to have negative height: Here in Norway it is vey hilly and I would like to have VLOS from the highest spot in the terrain.

I assume the reason why companies do not implement your requested feature is safety: It will for sure lead to some crashes and they do not want to have negative publicity.

I would like the possibility to start misson at current height: Then I can do a 360 to check for obstacles before mission starts.

However: DD minimum mission heigth is 10 meters. DJI Pilot mapping is even more conservative, minimum height is 25 meters.

For normal mapping this is ok as DD has a max solution at 1 cm/ pix.

However: My mission is tech inspection with a picture resolution better than 1 millimeter / pix. To achieve this I have to use a zoom lens and increase the overlap accordingly to avoid uncovered areas if the object height increases too much.

Now I think it becomes really messy; This includes some basic trig math and testing, but the probability of
a crash is increased!! For some missions it is better to use an app like DroneHarmony; It is Swiss based and they have developed a terrain following function where you can pinpoint obstacles to avoid.

3 Likes

Your idea of letting input a negative offset is brilliant, I think you should ask for it as well, after all it’s just a matter of allowing the same field/setting to have a wider operating range starting with minus sign.

Please support this request of mine in this thread, and chime in with your negative value request:

2 Likes

oh, and thanks a lot for this hint, it looks spectacular!

1 Like

I think this one is as simple as noone has really thought about it and brought it forward on this platform. I don’t think there’s anything potentially dangerous about the OP’s request. Putting in a simple offset basically just lets the software know that you are taking off from a point higher than you want the plan calculated to. I agree though that your idea on the other hand is potentially dangerous as you not only get into negative values, but perception of settings and how the Drone will travel from home to mission and home again. I’m sure it’s not the first time it’s been thought of, but here it is public and live.
what plan are you on? DroneDeploy is capable of much better than one inch per pixel. I just processed a map last night at 0.3in/px