Where do I find more info on how this app works? I simply cannot understand how the rest of the settings should be set as there are no guidlines at all.
For instance: I’m thinking about “Advanced settings”. Should it be ON or Off when using the Optimizer.
I also have some questions regarding how to think when setting the “Tallest landmark” number. And why does the “Image Density at tallest landmark” number turn Orange? What does that indicate?
I’m fiddeling around with the numbers and settings without really understanding what I’m doing and no information anywhere to be found… Does anyone have a link where I can find the answers? Or maybe help me out in a posting?
Hi @KRWaara, welcome! Personally I think you’re wasting your time with that app. The bottom line is that you want to run at least 75% front lap and 65% side. The one point that the app does raise is that if you have an area or object that is much taller than the rest of the map then the overlaps will greatly diminish in that area. If it is just and isolated area or a structure then you can take some separate shots of it, but if it is a larger portion of the map then you probably want to raise the altitude about half of that variance since DroneDeploy does not do terrain following. Beyond that anything higher than those overlap values is icing on the cake.
”Much taller than the rest of the map”. What about trees above 30 – 40 ft height? I have a tricky area containing deep forrest surrounding an area totally empty of any objects.
Why I’m using this app is because I find these ”Front lap” and ”Side lap” setting utterly confusing. I’m always standing there not knowing how to set the overlaps. I’m genrally trying to keep the height at 4 times the highest object, but overlaps is a total mess. And I’ve failed to find a turorial on this.
Is there a rule of thumb I can use? You mentioned ” at least 75% front lap and 65% side”. Can this be used as a rule? When is it not applicable?
Do you know of a tutorial on this? Height, overlap etc etc?
The most important Overlay is the Side Overlay. It controls the number of required passes back and fourth.
Everyone has there own theory on which is best for overlaps. If you have time for flying and processing, the best is a 80%/80% Overlaps. The issue with this is the DD plan your on, some plans may not allow you to upload that many photos. Flight Altitude has a lot to do with the Overlaps and the number of photos taken.
I flew a 86 acre site at 120’ with 80%/70% overlap and it took over 4500 photos. I did another 36 arce flight at 110’ with 80%/80% overlap and it took 3400 photos. Same 36 acre flight at 200’ with 80/80 took 1700 photos. Those are the examples on how the settings effect the number of photos.
If you fly low you can zoom into the Map and see a golfball on the ground at 250’ you see a object about the size of your forearm.
75/65 is recommended because it gives you around 12 images per points meaning that each recognizable object on the ground should be triangulated from 10-12 images to create a 3D point from the point cloud. This has little to do with the stitching of a simple orthomosaic map if that is the only data you are looking for. Higher overlaps come into play when you are looking for the best 3D data (point cloud) possible. You can always run higher overlaps if you mission will not consume an entire battery.
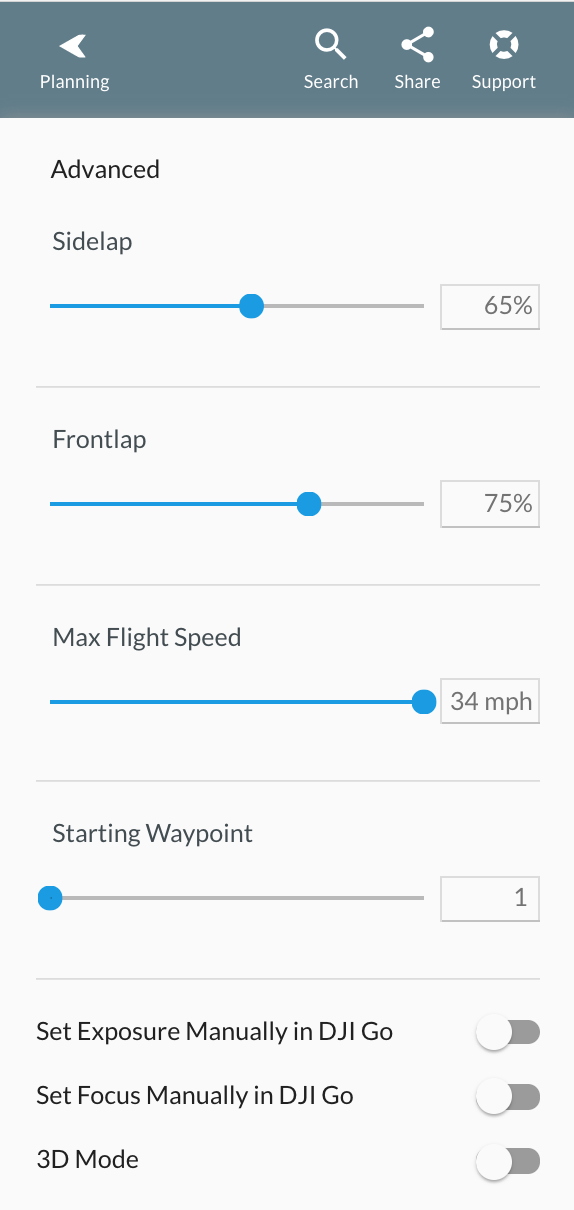
Advanced Settings
By clicking on “Advanced” in your flight’s settings, you can gain even greater control of the plan.
The advanced settings can be adjusted to help take better photos.
Increasing side overlap (sidelap) during planning
Flying with more overlap between each leg of the flight is the easiest way to get more matched features in the imagery, but it does come at the expense of reducing the area that your drone can cover in one flight.
Increasing front overlap (frontlap) during planning
This will increase the number of photos taken during each leg by simply making your camera take photos more quickly. Your camera will have a hard limit on how fast it can operate, so after you hit that point you will not see any further improvements.
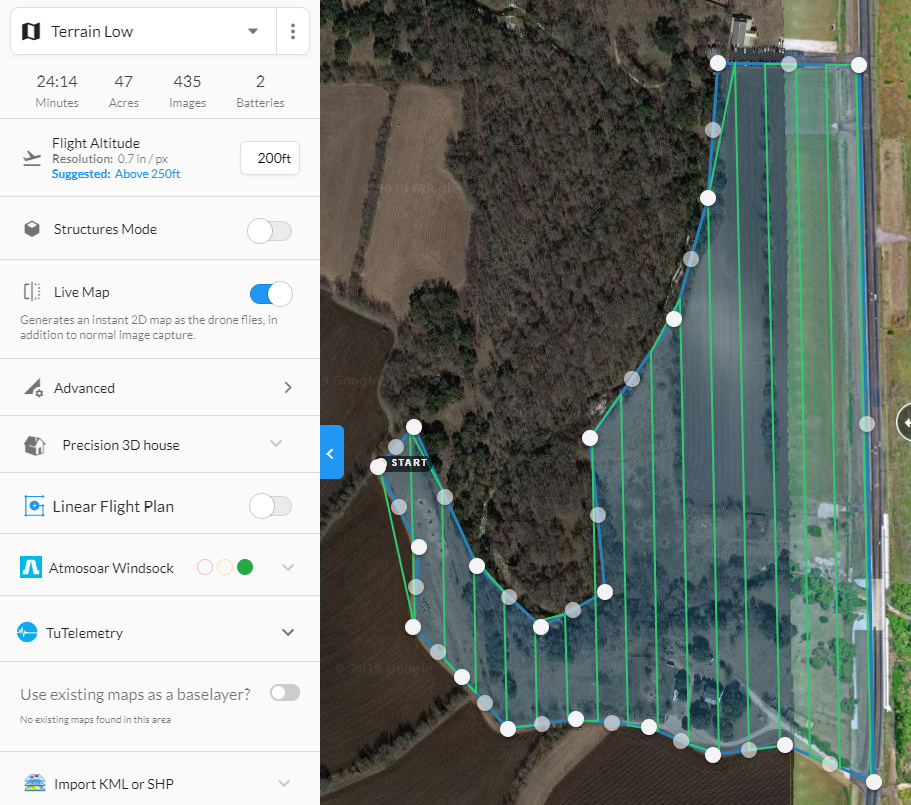
If you look at your Accuracy Report (available in the App Market) then you will see what happens when objects get out of range and not enough overlap was acquired. On the example below I captured good overlaps on my area of interest, but there is a 160ft bluff as you move east so the coverage gets slightly less. The are even a few trees that were taller than the rest and they show even worse coverage in spots. You can also see at the very edges of the map how only having one pass is unacceptable if I was trying to map that area.
I’m sorry if i reply like an idiot, but, as I mentioned in my initial posting, this is a complete mess for me.
@GregO: Beeing a small time drone operator with limited amount of customers i simply cannot afford a plan which swallows 3000 - 4000 images. I would love to, to get the crispiest quality available, but this comes with a hefty cost I can’t afford. I can barely takt the cost for a PRO - account at Dronedeploy… @MichaelL: I’ve seen the “Accuracy report” - app, and it’s an excellent app to tell you what went wrong. I’d like to know this in forehand in order to prevent this…
So you think think that an forward (Front) overlap of 75% and a sidelap of 65% would do the trick for me? How should I adjust the overlaps if I change height? Normally I do the capture at 4*highest point (tree), lets’s say 60 meters (we haven’t got that high trees in the north of sweden). But what if I have a flat area, deforrested, and decide to go down to 30 meters to increase details… How should the overlaps be changed then?
This is why I’m using the app. Everything is done.
Yes, 75/65 usually does a great job. I run 220-230ft 90% of the time. Like I said earlier, I would split the difference. If you are trying to capture a subject and want to get good coverage on something that is 40ft higher then I would run 240-250ft. Exception is that I adjust my altitude +/- 5ft to get the optimal battery usage.
You shouldn’t have to adjust if you fly a little higher, you will just get more coverage, but the downside is as Greg mentioned you will start to lose resolution once you get at 250ft or above. If your best resolution for export in DroneDeploy is 4in/px or above then it doesn’t matter anyways.
If your projects have 75ft or more in elevation variance and you need to capture things accurately at the upper elevation then I would run two flights. 50ft is not a big deal.
Finally, with overlaps I would make sure the plan is as efficient (least time) as possible by moving the flight direction (angle) slider. I can typically shave off a minute or so by dialing that in. Then if you need to adjust further then change your side overlap 1deg or so until you get it at the absolute efficiency. The difference between 63% (no less) and 65% is nearly unrecognizable, but can make a big difference in the overall number of lanes and time. Same goes with going up percentage points. I have had maps go down in time even though I raised the percentage a couple of points.
@MichaelL: The customers I have are all requesting Ortomaps. More or less. A few are asking for plain JPG:s. At the moment I have a gig in which I have to create an Ortho of a land fill area surrounded by some 15 meter (45 -ish ft) pine trees. Densly growing.
My plan is to keep the height of, as I described, 4 times the height of the pine trees, that is roughly 60 meters (180-ish ft). I think I’ll try 75 - 65 in overlpa settings.
Exactly what do you mean with “run two flights”?
BTW: Do you have a link I could use in times of deperation, like now?
I think that is a good place to start. The app will slow the drone to compensate for the lower altitude in order to get those overlaps. I ran a different flight software on this one, but if I tried to run it in DroneDeploy i would have had to do two separate flights and different altitudes. A pretty sharp 160ft elevation change that I ended up using Litchi and Terrain following. This is still in beta with DroneDeploy, but I was also able to switch directions mid-flight.
About “run two flights”? I don’t understand… Do you run two flights over the same area with different height and/or overlap settings or angles?
Yes, the link. I wonder if you know of a tutorial on the subject, Capturing-, height-, and overlap settings? In short: Where can I learn more?
However: A conclusion is that I’m not way off if I use my 60 meters, and follow your advice on overlap - settings. 75 - 65%.
I use DJI GO app to set Shutter/aperture. I normally lock the shutter an allow the aperture to “float”. I rally don’t know what happens in the DD -app if I uncheck the setting. Can the Dronedeploy app do the settings?
Create a master flight plan then duplicate it and adjust the vertices as needed to capture the low area. Then duplicate the master again and adjust to just the high area(s). Raise the altitude on the high flight to your liking. This doesn’t always work depending on how those areas interact with each other, but you will want to make sure that the common lines are on each other or overlapped a little. The flight may take longer than the master because of the odd shape, but all you images will be a consistent altitude from the subjects. It’s much quicker than flying the master twice. Don’t forget to adjust you advanced menu to optimize the flights.
I think the 60m with 75/65 is a fine place to start, but if you are not concerned with really tight elevations I would run more like 70-80m. It will produce a more accurately map horizontally.
DroneDeploy controls the camera fine on some drones and not so good on the Mavic series. Many Mavic owner seem to like setting their own focus and etc…
Sorry. Missed your posting.
Excellent explanation.
So the conclusion is that if i have ana area with big differences in topography (height) I should split the area into two parts, “low” and “high” and separate the capture? Keep the same height over both low and high.
And then mix the images when uploading them for processing?