Steep Terrain Question

I have a client that wants me to collect UAV imagery on a site that includes a hillside. From the bottom of the hill to the top of the property’s boundary, is in the neighborhood of 150m difference in elevation. Has anyone done something like this and if so, did you have to break it into multiple projects due to the changing elevation or due to legislative flight height imitations?

Under our SFOC, we can fly upto 400 feet AGL - but that will fall just short of the range in topography (~ 490 feet). The site is also too big for a single flight due to it’s size and also because it would be impossible to see the UAV across the entire site.

Thanks
Layne

Hi @Layne,

Thanks for swinging by the DroneDeploy forum. We currently don’t have any terrain awareness or following features so you’ll need to break it up into multiple flights.

Cheers,
Christina

You need to break it up into separate flights and try and stay roughly the same AGL (Above Ground Level), preferably within 50 m, altitude over the terrain. If you took off at three different levels up the slope you could still fly at 400 feet above that particular level. Just upload all the images as one flight.

Thank you Gary for your reply. It does help me out quite a bit. I’ll try to upload a pic of a map of the site to help clarify my question. At this time, we will only be flying the cleared portions within the green boundary.

This does however, lead me a lightly different question - can I load a georeferenced PDF into DroneDeploy as background and then use the contours (see bleow) as potential flight lines to be flown in manual mode?

image

Hi @Layne

That would be a very cool feature! Although, if you hadn’t used GCPs during the project I don’t know how much I would trust the elevation data attached to the file. You can use a shapefile to plan a mission using the kml and shapefile flight app which you can download from the app market on your dashboard.

We are looking into supporting terrain following and will be testing that feature very soon. Once we have decided it is reliable to fly with it will be incorporated into the product or release as an app. This looks like a very cool project!

Let us know if you have any questions moving forward.

Cheers!
Zach

I did a job that’s almost identical.

The flight height is not important.

I broke the job up into 2 flights.
I used GCPs included in both jobs.

The low altitude country was flown at 99 metre height above launch.
The high altitude country was flown at 200 metre height above launch and launched from a much higher launch site.

All the images were then uploaded and a single dtm created within DD.
I had 993 images making a total 7 gb upload.

The result was very good.

@Layne, @zach1, @Gary, @Jeremy, @Nipul,

You can do this job without GCPs since you are mainly concerned with adjusting the large offset in the elevation. To do this, you can use an Auto-Calibration Technique to achieve cm-level accuracy in the elevation data. This is done by first making maps using only 30 photos from a mission. Choose photos that encompass a point with known elevation, say where you would have placed a GCP. Process this subset of photos into maps. This will go very quickly. Then on the 2D map, measure the elevation of the known point. Now compute an offset = Known elevation of point - Measured elevation of known point. Next add this offset to the AbsoluteAltitude field in all the photos of the mission and generate new maps using all the photos. The new maps can have cm-level elevation accuracy if the elevation of the known point has cm-level accuracy and the known point is well modeled in DroneDeploy, which will happen if you put a high-contrast GCP target at the known point.

If you do this for each of your missions (or all the missions you ever fly so that you always have excellent elevation data in your maps), then you can combine photos from multiple missions to make one big map.

GCPs are better if you want better GPS longitude and latitude data in your maps also. But for your case, the elevation error due to the offset in launch elevations is 10 to 100 times larger. So you get the biggest bang for your buck by just correcting the elevation data at zero cost.

The only technical part of this approach is adding the offset to the AbsoluteAltitude field in the Exif data of the photos. For that I wrote a Python script that does a binary search and replace of the AbsoluteAltitude field. Perhaps you can also do this or have a friend that can do it for you. The key is to change the AbsoluteAltitude field that looks like this:
drone-dji:AbsoluteAltitude="+275.96"
to this when, for example, the offset is 11.04 meters:
drone-dji:AbsoluteAltitude="+287.00"

Anyway this is working great for my missions and, since I am on a free Pro trial with no support of GCPs, it was something I could try out. I also learned that I could not manually edit the Exif data using a simple editor like Notepad in Windows 10 since it mangles the Exif data after saving. Nor could I use the widely available exiftool by Phil Harvey since it writes out the data in a format that DroneDeploy cannot parse. My 20-line Python script automatically processes all the photos from a mission to add the offset, taking about 100 sec to process 143 photos with 1 GB of data. My script is not very portable because it runs inside the 3D Rhino program using their RhinoPython variant but it can easily be ported to another Python version or other language. A copy is below. I had to use __ to show leading spaces as otherwise they are squeezed out of the post and note that the difficult to decipher ‘’’’ is actually ’ followed by " followed by '.

Python program to add offset to DJI AbsoluteAltitude field in Exif data of all the photos in a directory.
from time import time
import System
startime = time()
altitudeOffset = 11.01 # Set this to: Offset = Actual altitude - altitude measured on DD map
dir = ‘C:\Users\Terry\Pictures\fixelev’ # Set this to directory with photos
key = ‘drone-dji:AbsoluteAltitude="+’ # Fixed part of search pattern
files = System.IO.Directory.GetFiles(dir, ‘*.JPG’)
for file in files: # Offset the altitude in all photos
__ f = open(file,‘rb’); s = f.read(); f.close() # Open, binary read file and close
__ i = s.rfind(bytes(key)) + len(key) # Find pointer to value of absolute altitude
__ if i == len(key)-1: # then rfind returned -1 since it did not find key
____ print ‘The key:’, key , ’ was not found in file ‘, file, ‘\nPlease fix and retry’
____ exit()
__ oldAlt = str(s[i:i+10]).split(’"’,1)[0] # 10 works for up 100,000ft; Remove " and beyond
__ original = bytes(key + oldAlt + ‘"’) # Construct byte pattern for search
__ new = float(oldAlt) + altitudeOffset # Add offset to old altitude
__ fixed = bytes(key + ‘{0:.2f}’.format(new) + ‘"’) # Construct replacement bytes
__ s=s.replace(original, fixed, 1) # Search and replace bytes
___ with open(file, ‘wb’) as output_file: # Open file for binary write.
_____ output_file.write(s) # Write byte array to file.
__ print file, oldAlt, ‘{0:.2f}’.format(new) # Write summary of change for each file
print ‘Time = {0:.3f} sec to add altitude offset of {1:.3f} to {2} files.’.format(time()-startime, altitudeOffset, len(files))

This Auto-Calibration Technique is like creating a virtual, altitude-only GCP which is all you really need in some situations. And it only takes about 30 minutes of preprocessing time to generate the 30-photo map and update the altitude data. Plus it can be applied retroactively, allowing you to improve the elevation accuracy of old maps. You just need to have kept the photos and be able to identify a point with known elevation that has enough texture to be well modeled by DroneDeploy. I do nothing special for my missions, using no special targets. I just use a concrete surface that I know is at 1000’ elevation. This surface has an exposed-aggregate finish which is enough for DroneDeploy to model well in 3D.

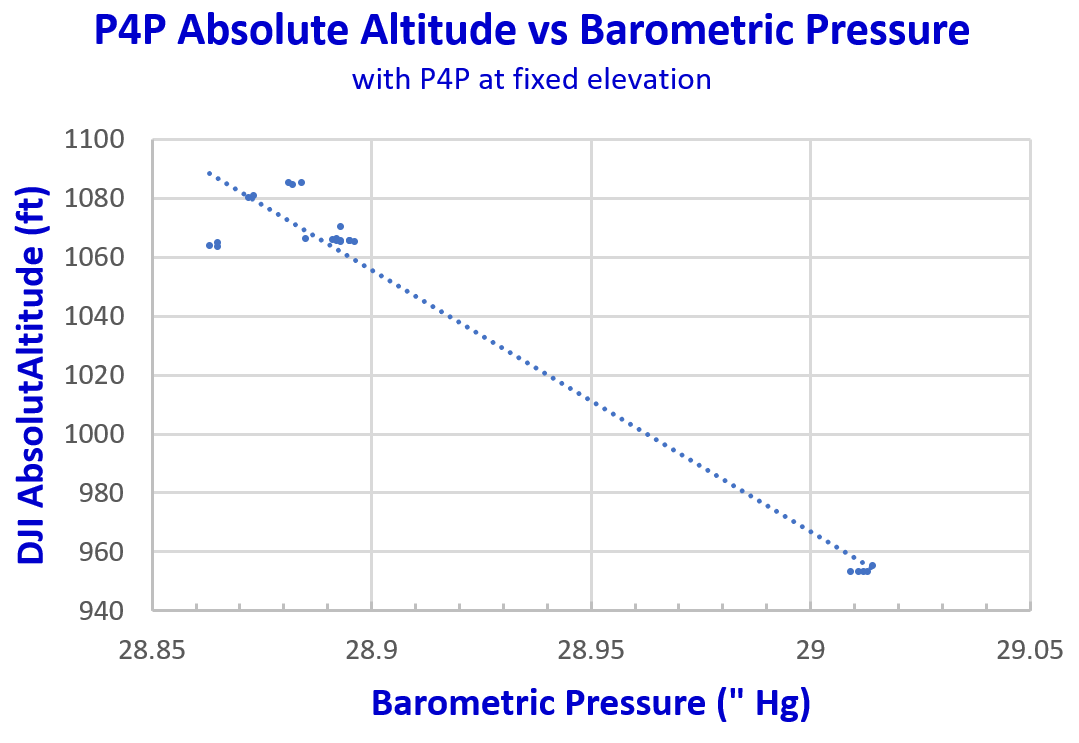
I recommend doing this for all your missions whether or not you are combining pictures from multiple missions because it always gives you maps with accurate elevation data with zero added cost. Otherwise the elevation can move around by up to 1000’ over the course of a year due to the typical 1" variation in barometric pressure. I know this is true for my Phantom 4 Pro because it uses its on-board barometer to calculate the altitude. Over a 2-week period, the measured elevation of the same point on maps from different missions varied by 500’. And I suspect most drones will see this same issue as they likely use their on-board barometer to calculate the altitude that is recorded in the Exif data and to fly level during a mission.

Regards,
Terry.

wow!

totally unnecessary if you’re using a decent aircraft such as a P4p - it uses GNSS which is accurate in xyz to about 3 metres or better most of the time

barometric pressure - isn’t that what Fred Flintstone used?

…and of course you don’t need to used GCPs - i used then and the varied flight height didn’t cause any issues on a pixel clarity of about 2 cm

@Daniel777,

I am using a P4P and it really does use barometric pressure. You can confirm this yourself. Take your drone and sit in on a fixed surface. Bring up DJI Go 4. Take a few pictures. Turn off your P4P and wait until you have a day on which the barometric pressure is different by 0.1" (I use Barometer Plus on my Note 8 smartphone to check the pressure). Then put out the drone and take a few more pictures. Now look at the AbsoluteAltitude field in the Exif data of the two sets of pictures. You will see that it differs by 100’.

You can use exiftool by Phil Harvey to look at the Exif information:
exiftool c:\path\to\file\filename -AbsoluteAltitude -n

I have done this many times and documented the result under my Forum topic of:
500’ Elevation Variation Recorded for Takeoff from the Same Spot
You will find this under Latest and then just scroll down a little bit.

Below you will find a copy of a section from that topic. It includes a graph of the P4P AbsoluteAltitude value recorded in the Exif data of a photo (and also copied to the GPS Altitude entry) vs the local barometric pressure from the Barometer Plus app on my smartphone.

You can also generate your own data with a P4P drone and smartphone Barometer App (I suggest Barometer Plus in the PlayStore). Just put the P4P in a fixed location and record the barometer reading when you snap a picture. Then plot the AbsoluteAltitude from the picture vs the Barometer reading from the App. You will see that it moves around with the barometer. You need to do this at a time when the Barometer is changing by more than 0.1" over a few hours. This will give over a 100’ change in the recorded AbsoluteAltitude in the Exif data. And I know from my experience, once the AbsoluteAltitude value changes, the elevation reported in the Location Annotation will also change.

Below is a graph I generated a few days ago over an 8 hour period when the weather was changing a bit. I saw a 0.151" Hg pressure change which the P4P thought changed the AbsoluteAltitude by 132’. All the while the P4P sat at a fixed location with constant elevation. Many P4P users may never see this magnitude of change in the AbsoluteAltitude as they probably fly on days with calm weather when the barometric pressure is nominal (around 30" Hg and sea-level and 29" Hg at my 1000’ elevation). Only missions flown when there is a significant difference in the barometric pressure will show an elevation variation larger that what you would expect from a GPS measured altitude. So most pilots probably chalk up the variation as not significant. And pilots flying with GCP’s will probably not see any of this issue.

Let me know if your experiment shows something different. Be sure to turn you P4P off between pictures since I found that if the P4P sits in the same location for an extended period of time, then it can record a nearly constant AbsoluteAltitude even when the barometric pressure changes substantially. I believe this is due to the IMU signaling that there has been no vertical movement so the altitude being recorded should remain constant. It is not GPS doing this as I had the P4P indoors where it could not see satellites. This behavior is yet another clever choice of the DJI engineers to provide the P4P with a steady altitude reading. This further improves the relative accuracy of the AbsoluteAltitude value recorded. But it does nothing to improve its absolute accuracy. Again, for that, you need GCP’s or Self-Calibration.

Please also note that the P4P does not record any GPS Altitude data in the Exif of photos. The Exif data does have a GPS Altitude entry but you will find that it is a copy of the AbsoluteAltitude entry.

On the web I found:
But as an observed measure, vertical accuracy of GNSS (GPS) receivers seems to typically be 1.7 times that of the stated horizontal accuracy. So using the previously stated example, a receiver with specs that state 3 - 5 m CEP horizontal accuracy would likely provide 5.1 - 8.5 m CEP vertical accuracy.
This is not 3 m and is why DJI chose to use the much more constant barometric pressure during a 10-min mission. It results in 10X better horizontal flying, has good relative accuracy and is totally hosed on absolute accuracy. Which Auto-Calibration fixes.

Regards,
Terry.

@Daniel777,

If you fly on calm days with the barometric pressure close to nominal (30" Hg at sea-level, 29" at my altitude of 1000’), then you probably chalk up any elevation change you see at the same point on a map to GPS altitude noise. And I did initially. But then as I read more, I found some who claimed the P4P altitude was based upon its on-board barometer. Not wanting to believe this (because GPS is great and wonderful), I spent some time doing my own measurements. And you know my conclusion from reading above. Please do your own experiments and tell me it’s not so, that the Great and Wonderful Wizard of GPS is still alive and kicking in computing the P4P’s altitude. Sadly, I no longer believe this. But hopefully in the future, the Wizard of GPS will rule again, with PPP corrections for everyone that deliver cm-level x,y,z accuracy.

Regards,
Terry.